Integrating Consul Connect Service Mesh with Traefik 2.5
Traefik Proxy v2.5 has learned a new ability: to speak natively to any service running inside of a Consul Connect service mesh. This enables you to use Traefik Proxy on the edge of your network, as a point of ingress from the outside world, into your secure private network.
This article will discuss the background and integration of the two technologies, and demonstrate how to install Consul and Traefik Proxy v2.5, on a fresh Kubernetes cluster, first in a development environment, and then moved to production.
Although this article's focus is on deployment with Kubernetes, Consul Connect also works with HashiCorp's Nomad, and Traefik Proxy v2.5 fully supports Nomad with Consul Connect.
Setup
You will need the following:
-
A fresh Kubernetes cluster, in a development environment, and a workstation with
kubectlconfigured for access to this cluster. Personally, I am using K3s on Proxmox, and these instructions have also been tested in Docker with kind. Many other platforms that you can use have been discussed on our blog recently. -
Install these command line tools on your workstation:
-
Optional: an internet domain name, with DNS that you control, hosted on one of the supported ACME DNS providers. (This is a requirement in development if you want to automatically generate valid TLS certificates, with the Let's Encrypt
DNS-01challenge, initiated from a private firewalled network.) -
Optional: a production/staging cluster to deploy to, after successful testing in development.
Introduction to Consul
If you are designing an application system based on a microservices architecture, you have many new challenges, as compared to the monolith application:
-
Discoverability - your services need to discover each other, in order to be able to talk to each other.
-
Configurability - your services need to be configured, as one system, all at the same time.
-
Segmentation - your services need fine-grained access control between them, to ensure that only specific sets of services should be able to communicate with each other.
By adding Consul as a new layer to your infrastructure, it addresses these challenges with the following solutions:
-
Consul Catalog registers all of your services into a directory, and so they become discoverable throughout your network. By creating tags on the catalog entries of these services, you can provide configuration data to all of your services.
-
Consul Connect is a proxy layer that routes all service-to-service traffic through an encrypted and authenticated (Mutual TLS) tunnel. Consul Intentions acts as a service-to-service firewall, and authorization system. The default firewall is open, allowing any mesh service (client) to connect to any other mesh service. Full segmentation can be easily achieved by creating a
Deny allrule, and then adding each explicit service-to-service connection rule needed.
This article is focused on Consul Connect, and on the new features for it, introduced in the Traefik Proxy v2.5 release. However, in order to give you a complete picture, the instructions for the entire cluster creation will be provided from scratch, including brief discussions of these other Consul features along the way. However, if you are new to Consul, or service meshes in general, check out HashiCorp Learn : Introduction to Consul.
Traefik Proxy and the Consul Connect protocol
Consul Connect normally requires every service Pod in your mesh to inject a sidecar container (Envoy proxy). This sidecar reconfigures the Pod networking to proxy all traffic through a TLS connection, with mutually authenticated (mTLS) certificates, signed and automatically issued by your Consul server's certificate authority. The sidecar also enforces firewall rules, allowing or denying authenticated connections based on Intentions.
Because all of this is taken care of in the sidecar, this is transparent to your application containers. Your services and clients do not need to care about any mTLS or firewall implementation details. However, this presents a problem if you need to expose one or more private services to a public network, outside of the service mesh.
Traefik Proxy now has native support for the Consul Connect protocol, which means that the Pod running Traefik Proxy does not need to run the Envoy sidecar, and can connect to mesh services directly. Therefore, Traefik can live in both worlds at the same time: outside of the service mesh (on an endpoint where it can provide normal ingress duties), and inside of the service mesh (where it can use Consul Connect to bridge external requests to private services). Traefik Proxy can automatically discover your services, and configure routes through the Consul Catalog provider.
As of Traefik Proxy v2.5, the Connect feature currently only supports HTTP(s), however this may be expanded to include TCP traffic in the future.
Setup your cluster
You should now have kubectl and helm installed on your workstation, and have access to your cluster. Test that it works with kubectl get nodes:
$ kubectl get nodes
NAME      STATUS   ROLES                  AGE   VERSION
k3s-1-1   Ready    control-plane,master   1d    v1.21.2+k3s1
k3s-1-3   Ready    <none>                 1d    v1.21.2+k3s1
k3s-1-2   Ready    <none>                 1d    v1.21.2+k3s1
(You should see all of the nodes of your development cluster listed with status Ready.)
Add the Traefik and Consul Helm repositories to your workstation, run:
helm repo add traefik https://helm.traefik.io/traefik
helm repo add hashicorp https://helm.releases.hashicorp.com
helm repo update
Create a directory someplace on your workstation, to store cluster configuration files. The rest of the commands in this article will assume this to be your current working directory:
mkdir -p ${HOME}/git/traefik-consul-connect-demo
cd ${HOME}/git/traefik-consul-connect-demo
Install Consul in the development environment
Consul installation is straightforward, via Helm chart. Create a new file, named consul-values.yaml:
# consul-values.yaml   -- Consul Helm Chart Values
global:
  name: consul
  datacenter: dc1
  image: hashicorp/consul:1.10
  imageEnvoy: envoyproxy/envoy:v1.19-latest
  metrics:
    enabled: true
  tls:
    enabled: true
    enableAutoEncrypt: true
    verify: true
    serverAdditionalDNSSANs:
      ## Add the K8s domain name to the consul server certificate
      - "consul-server.consul-system.svc.cluster.local"
  ## For production turn on ACLs and gossipEncryption:
  # acls:
  #   manageSystemACLs: true
  # gossipEncryption:
  #   secretName: "consul-gossip-encryption-key"
  #   secretKey: "key"
server:
  # Scale this according to your needs:
  replicas: 1
  securityContext:
    runAsNonRoot: false
    runAsUser: 0
ui:
  enabled: true
controller:
  enabled: true
prometheus:
  enabled: true
grafana:
  enabled: true

connectInject:
  # This method will inject the sidecar container into Pods:
  enabled: true
  # But not by default, only do this for Pods that have the explicit annotation:
  #        consul.hashicorp.com/connect-inject: "true"
  default: false
syncCatalog:
  # This method will automatically synchronize Kubernetes services to Consul:
  # (No sidecar is injected by this method):
  enabled: true
  # But not by default, only for Services that have the explicit annotation:
  #        consul.hashicorp.com/service-sync: "true"
  default: false
  # Synchronize from Kubernetes to Consul:
  toConsul: true
  # But not from Consul to K8s:
  toK8S: false
Create a new namespace to install Consul:
kubectl create namespace consul-system
Install Consul, via the Helm chart, passing your consul-values.yaml file, run:
## This command (re-)installs consul, from consul-values.yaml:
helm upgrade --install -f consul-values.yaml \
  consul hashicorp/consul --namespace consul-system
You should see a number of new Pods running in the consul-system namespace:
kubectl get pods -n consul-system
# output from:  kubectl get pods -n consul-system
NAME                                                          READY   STATUS    RESTARTS   AGE
prometheus-server-5cbddcc44b-gv669                            2/2     Running   0          2m26s
consul-webhook-cert-manager-699f6b587f-ms299                  1/1     Running   0          2m26s
consul-connect-injector-webhook-deployment-64d55df76f-qvjnm   1/1     Running   0          2m25s
consul-controller-dff49c9f4-jc54p                             1/1     Running   0          2m26s
consul-connect-injector-webhook-deployment-64d55df76f-8mdjs   1/1     Running   0          2m26s
consul-server-0                                               1/1     Running   0          2m26s
consul-zvhc8                                                  1/1     Running   0          2m26s
consul-nmfxc                                                  1/1     Running   0          2m25s
consul-7cnmt                                                  1/1     Running   0          2m25s
Load the Consul Dashboard in your browser
To load the Consul Dashboard, open a new terminal with which to run a temporary tunnel:
# Run this in a new terminal or put it in the background :
kubectl port-forward --namespace consul-system service/consul-ui 18500:443
The tunnel will remain active for as long as this command runs. Press Ctrl-C to quit when you are finished.
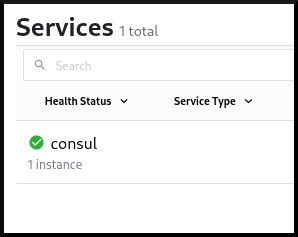
Open your web browser to https://localhost:18500/ (you must accept to use the self-signed TLS certificate), and you will see the Consul dashboard. On the main page is a list of the Services that have been registered with the Consul Catalog.
Create a service
For testing purposes, you will need to deploy a service to add to your new service mesh. The containous/whoami image deploys a simple HTTP server useful for testing connections.
Create a new file, whoami.yaml:
# whoami.yaml
apiVersion: v1
kind: Service
metadata:
  name: whoami
  namespace: consul-demo
spec:
  ports:
  - name: web
    port: 80
    protocol: TCP
  selector:
    app: whoami
---
apiVersion: apps/v1
kind: Deployment
metadata:
  labels:
    app: whoami
  name: whoami
  namespace: consul-demo
spec:
  replicas: 1
  selector:
    matchLabels:
      app: whoami
  template:
    metadata:
      labels:
        app: whoami
      annotations:
        # Required annotation in order to inject the envoy sidecar proxy:
        consul.hashicorp.com/connect-inject: "true"
    spec:
      containers:
      - image: containous/whoami
        name: whoami
        ports:
        - containerPort: 80
          name: web
This is a standard Service and Deployment definition, with the only addition being the annotation added to the Deployment Pod spec template: consul.hashicorp.com/connect-inject: "true", which informs Consul that it should inject the envoy sidecar into the Pod, thus registering the Service into the mesh.
Deploy the whoami service into a new namespace, run:
kubectl create namespace consul-demo
kubectl apply -f whoami.yaml
On the Consul dashboard, you should now see the whoami service listed, and labeled with a green check mark, and the words: in service mesh with proxy.
You can test that the service works via another kubectl port-forward:
# Run this in a new terminal or put it in the background :
kubectl port-forward -n consul-demo svc/whoami 8000:80
Use curl to test the whoami service across the tunnel:
curl http://localhost:8000
You should get a response like:
Handling connection for 8000
Hostname: whoami-6c648db8f4-r5bx4
IP: 127.0.0.1
IP: ::1
IP: 10.42.2.93
IP: fe80::9064:13ff:fe50:d118
RemoteAddr: 127.0.0.1:37942
GET / HTTP/1.1
Host: localhost:8000
User-Agent: curl/7.77.0
Accept: */*
Registering Services with Consul Catalog
The whoami service is automatically registered into the Consul Catalog, and is listed on the Consul dashboard, and is also now a part of the service mesh. But how did this happen? With Kubernetes, there are two separate systems for registering a Service into the Consul Catalog, depending on annotations on the Pod or the Service, and depending whether the Service will use Consul Connect, or not. For each of your services, you only need to choose one of these annotations, not both (otherwise you will have duplicate entries in the Consul Catalog):
-
To add the service to Consul Catalog and to the Consul Connect service mesh: add the Pod spec annotation (in Deployments and StatefulSets):
consul.hashicorp.com/connect-inject: "true", this will inject the sidecar proxy into the Pod, and automatically register the service into Consul Catalog, and add it to the Consul Connect service mesh. This is the method used for thewhoamiservice you just deployed. -
To add the service only to the Consul Catalog, without injecting the sidecar proxy: add the Service annotation:
consul.hashicorp.com/service-sync: "true", this is for existing non-mesh Services. The sidecar proxy is not used. This is the method that will be used for Traefik Proxy (explained in the next sections), since Traefik Proxy does not need a sidecar in order to use Consul Connect.
Look closely at the Helm chart values (consul-values.yaml) and you will see how these Pod and Service annotations will be interpreted by Consul:
# Snippet from consul-values.yaml
connectInject:
  # This method will inject the sidecar container into Pods:
  enabled: true
  # But only do this for the Pods that have the explicit annotation:
  #        consul.hashicorp.com/connect-inject: "true"
  default: false
syncCatalog:
  # This method will automatically synchronize Kubernetes services to Consul:
  # (No sidecar is injected by this method):
  enabled: true
  # But only synchronize the Services that have the explicit annotation:
  #        consul.hashicorp.com/service-sync: "true"
  default: false
  # Synchronize from Kubernetes to Consul:
  toConsul: true
  # But not from Consul to K8s:
  toK8S: false
The connectInject settings make it so that adding the Consul Connect service
mesh is opt-in, for each Pod. With the helm value connectInject.enabled: true,
Consul will monitor all of the Pods in your cluster. If any new Pod is created
with the annotation consul.hashicorp.com/connect-inject: "true", Consul will
automatically inject the envoy sidecar proxy into that Pod. Because of the helm
value connectInject.default: false, it does not do this automatically for
every Pod, but only for those Pods that have this annotation.
The syncCatalog settings start a separate process that will synchronize your existing services into the Consul Catalog. It will continuously monitor your Kubernetes Services, and if any are found with the annotation consul.hashicorp.com/service-sync: "true" these services will be automatically registered into the Consul Catalog (and therefore making them show up on the Consul dashboard). The name of the service in Consul may be customized with the annotation consul.hashicorp.com/service-name.
Install Traefik Proxy in your development environment
A development environment is usually performed on a laptop computer, on a private LAN network, without any external port forwarding, so therefore, in order for Traefik Proxy to request TLS certificates from Let's Encrypt, you will need to use the DNS-01 challenge type, in order to prove that you control your domain's DNS records. (HTTP and TLS challenge types are much easier to use, in an internet server environment, but these will not work in a development environment, unless you do port forwarding on your network router.) One bonus you will get for using the DNS-01 challenge type, is that you may create a wildcard TLS certificate, thus requiring only a single certificate (and single renewal) for all of your domains, and so for this feature alone, it makes it a good choice for production environments too.
This example uses the DigitalOcean DNS provider, but you need to use the appropriate provider for your domain's DNS host. Traefik Proxy supports 90+ different DNS providers, you will need to check this list and find the "Provider code" and environment variables necessary for your particular DNS provider. The environment variable names are different for each provider, and each contain the specific authentication credential(s) for that particular provider's DNS API.
Create the traefik-system namespace:
kubectl create namespace traefik-system
Traefik Proxy needs a copy of the Consul certificate authority TLS certificate. Copy the Secret resource from the consul-system namespace into the traefik-system namespace:
kubectl get secret consul-ca-cert -n consul-system -oyaml | \
  sed 's/namespace: consul-system$/namespace: traefik-system/' | \
  kubectl apply -f -
Traefik installation is performed via Helm chart. Create a new file, named traefik-values.yaml, with these contents:
# Traefik Helm values
# Make sure to add all necessary ACME DNS environment variables at the bottom.
image: name: traefik tag: "v2.5" persistence: enabled: true volumes:
  - name: consul-ca-cert mountPath: "/certs/consul-ca/" type: secret additionalArguments: # - "--log.level=DEBUG" ## Forward all HTTP traffic to HTTPS
  - "--entrypoints.web.http.redirections.entryPoint.to=:443" ## ACME config
  - "--certificatesresolvers.default.acme.storage=/data/acme.json"
  - "--certificatesresolvers.default.acme.dnsChallenge.provider=$(ACME_DNSCHALLENGE_PROVIDER)"
  - "--certificatesresolvers.default.acme.email=$(ACME_EMAIL)"
  - "--certificatesresolvers.default.acme.caserver=$(ACME_CA_SERVER)" ## Consul config: # Enable Traefik to use Consul Connect:
  - "--providers.consulcatalog.connectAware=true" # Traefik routes should only be created for services with explicit `traefik.enable=true` service-tags:
  - "--providers.consulcatalog.exposedByDefault=false" # For routes that are exposed (`traefik.enable=true`) use Consul Connect by default:
  - "--providers.consulcatalog.connectByDefault=true" # Rename the service inside Consul: `traefik-system-ingress`
  - "--providers.consulcatalog.servicename=traefik-system-ingress" # Connect Traefik to the Consul service:
  - "--providers.consulcatalog.endpoint.address=consul-server.consul-system.svc.cluster.local:8501"
  - "--providers.consulcatalog.endpoint.scheme=https"
  - "--providers.consulcatalog.endpoint.tls.ca=/certs/consul-ca/tls.crt"
  #### Optional, uncomment to use Consul KV as a configuration provider:
  ## - "--providers.consul.endpoints=consul-server.consul-system.svc.cluster.local:8501"
  ## # The key name in Consul KV that traefik will watch:
  ## - "--providers.consulcatalog.prefix=traefik"
service:
  annotations:
    # Register the service in Consul as `traefik-system-ingress`:
    consul.hashicorp.com/service-sync: "true"
    consul.hashicorp.com/service-name: "traefik-system-ingress"
deployment:
  # Can only use one replica when using ACME certresolver:
  # (Use Traefik Enterprise to get distributed certificate management,
  #  for multi-replica and multi-cluster deployments.)
  replicas: 1
  initContainers:
    ## volume-permissions makes sure /data volume is owned by the traefik security context 65532
    - name: volume-permissions
      image: busybox:1.31.1
      command: ["sh", "-c", "chown -R 65532:65532 /data && chmod -Rv 600 /data && chmod 700 /data"]
      volumeMounts:
        - name: data
          mountPath: /data
    ## DEBUG: add a sleep before Traefik starts, to manually fix volumes etc.
    # - name: sleep
    #   image: alpine:3
    #   command: ["sh", "-c", "sleep 9999999"]
    #   volumeMounts:
    #     - name: data
    #       mountPath: /data
ports:
  ## Add the wildcard certificate to the entrypoint, then all routers inherit it:
  ## https://doc.traefik.io/traefik/routing/entrypoints/#tls
  websecure:
    tls:
      enabled: true
      certResolver: default
      domains:
        - main: "$(ACME_DOMAIN)"
env:
  ## All ACME variables come from traefik-acme-secret:
  - name: ACME_DOMAIN
    valueFrom:
      secretKeyRef:
        name: traefik-acme-secret
        key: ACME_DOMAIN
  - name: ACME_EMAIL
    valueFrom:
      secretKeyRef:
        name: traefik-acme-secret
        key: ACME_EMAIL
  - name: ACME_CA_SERVER
    valueFrom:
      secretKeyRef:
        name: traefik-acme-secret
        key: ACME_CA_SERVER
  - name: ACME_DNSCHALLENGE_PROVIDER
    valueFrom:
      secretKeyRef:
        name: traefik-acme-secret
        key: ACME_DNSCHALLENGE_PROVIDER

  # Add all of the environment variables necessary
  # for your domain's DNS ACME challenge:
  # See https://doc.traefik.io/traefik/https/acme/#providers
  # Put the actual secrets into traefik-acme-secret
  - name: DO_AUTH_TOKEN
    valueFrom:
      secretKeyRef:
        name: traefik-acme-secret
        key: DO_AUTH_TOKEN
Create a new file traefik-secret.yaml, customizing your email address (example: [email protected]), your ACME DNS provider code (example: digitalocean), and ACME DNS credentials variables (example: DO_AUTH_TOKEN):
# traefik-secret.yaml
apiVersion: v1
kind: Secret
metadata:
  name: traefik-acme-secret
  namespace: traefik-system
stringData:
  # Enter your Email address to register with Let's Encrypt:
  ACME_EMAIL: [email protected]
  # Switch ACME_CA_SERVER for staging or production certificates:
  # For production use: https://acme-v02.api.letsencrypt.org/directory
  ACME_CA_SERVER: https://acme-staging-v02.api.letsencrypt.org/directory
  # Configure your ACME DNS provider code:
  # See https://doc.traefik.io/traefik/https/acme/#providers
  ACME_DNSCHALLENGE_PROVIDER: digitalocean
  # Put all of your ACME DNS credential environment variables here:
  # See https://doc.traefik.io/traefik/https/acme/#providers
  DO_AUTH_TOKEN: xxxx-your-actual-auth-token-here
You need to list all of the environment variable names for your ACME DNS provider, and their values, in the traefik-secret.yaml file under the stringData: section. Since this file stores sensitive credentials, you need to be careful with where you store this file. (Adding it to a .gitignore file, changing the file permissions, and/or creating Sealed Secrets are good ideas, but will not be elaborated here.)
Create the secret:
kubectl apply -f traefik-secret.yaml
You should delete traefik-secret.yaml now so that it only exists inside the cluster.
Install the Traefik Proxy helm chart:
helm upgrade --install -f traefik-values.yaml --namespace traefik-system \
     traefik traefik/traefik
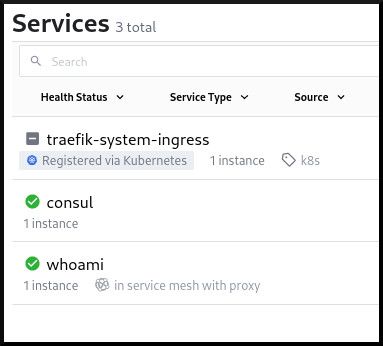
Check back on the Consul dashboard, and you will see new service entries for traefik-system-ingress and whoami:
Configure whoami route by adding Consul tags to Services
When using the Consul Catalog provider, Traefik Proxy routes are added by creating service tags in Consul. This can be done via the Consul HTTP API, or from the Kubernetes API, by adding an annotation in the Deployment Pod spec.
Edit the existing whoami.yaml, and replace the entire contents with:
apiVersion: v1
kind: Service
metadata:
  name: whoami
  namespace: consul-demo
spec:
  ports:
  - name: web
    port: 80
    protocol: TCP
  selector:
    app: whoami
---
apiVersion: apps/v1
kind: Deployment
metadata:
  labels:
    app: whoami
  name: whoami
  namespace: consul-demo
spec:
  replicas: 1
  selector:
    matchLabels:
      app: whoami
  template:
    metadata:
      labels:
        app: whoami
      annotations:
        consul.hashicorp.com/connect-inject: "true"
        ## Comma separated list of Consul service tags:
        ## Needs to be one line and no spaces,
        ## but can split long lines with \ in YAML:
        consul.hashicorp.com/service-tags: "\
          traefik.enable=true,\
          traefik.http.routers.whoami.entrypoints=websecure,\
          traefik.http.routers.whoami.rule=Host(`whoami.example.com`)"
    spec:
      containers:
      - image: containous/whoami
        name: whoami
        ports:
        - containerPort: 80
          name: web
The difference from before is the annotation lines added to the Deployment Pod spec: consul.hashicorp.com/service-tags. The value for this annotation must be all one line, tags separated with commas, and no spaces. In order to make it more readable, the line is wrapped onto multiple lines with the \ character after the commas.
Save whoami.yaml and redeploy it:
kubectl apply -f whoami.yaml
The Consul Catalog provider, inside Traefik Proxy, will automatically detect these tags, and enable route ingress to the Pod for the host whoami.example.com via HTTPs, using the default certificate resolver.
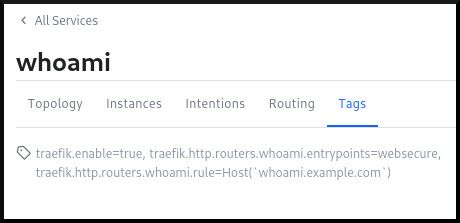
Check the Consul dashboard, click on the whoami service, and navigate to the Tags tab. Under this tab you should see all of the new tags.
Create DNS records for whoami
Find the IP address of your Traefik service LoadBalancer:
kubectl get svc -n traefik-system traefik
(This may show multiple IP addresses, you only need to use one of them.)
You have two options for setting the DNS record:
- Temporarily in your
/etc/hostsfile (only usable on your workstation) or via another local DNS server:
# Example in /etc/hosts
192.168.X.X   whoami.example.com
-
Or you may create a wildcard DNS type
Arecord, on your public DNS host:- A wildcard DNS entry is useful because it only needs to be setup one time, and then you can use any conceivable sub-domain without needing any additional setup.
- On your DNS host, create a DNS type
Arecord for*.example.com(replace with your domain name) and point it to one of the LoadBalancer IP addresses.
kubectl get svc --all-namespaces | grep LoadBalancer
* For your development domain name, it is fine for this to be a private IP address. It just won't be accessible from everywhere.
Test the whoami ingress route
Here's what you've accomplished so far:
- You've installed Consul.
- You have installed Traefik Proxy, and configured it to use Consul Connect and the Consul Catalog provider.
- You have a Service (
whoami), and annotations to inject the sidecar, and is now registered into Consul Catalog, and the service mesh. The Service provides aservice-tagsannotation declaring all of the Traefik dynamic configuration, and exposes the route. - You have DNS setup (locally or globally) for your development domain name, pointing to your Traefik service LoadBalancer IP address.
Now you have successfully exposed the whoami service, from inside your Consul service mesh, to the outside network, through Traefik Proxy!
Test the whoami route with curl (replace whoami.example.com with your actual domain name):
curl -k https://whoami.example.com
You should also verify the certificate details:
curl -vIIk https://whoami.example.com
Look for the field called subject:
- The subject value should be
CN=*.example.com(except it should say your domain), this shows that this is a wildcard certificate.
Look for the field called issuer:
- For Let's Encrypt staging, the issuer is :
C=US; O=(STAGING) Let's Encrypt; CN=(STAGING) Artificial Apricot R3 - For Let's Encrypt production, the issue is:
C=US; O=Let's Encrypt; CN=R3
If the issuer is CN=TRAEFIK DEFAULT CERT, then this means that ACME certificate generation has failed, or has been misconfigured, and you should check the logs or the dashboard for the reason:
kubectl logs -n traefik-system deploy/traefik
Check the Traefik Proxy dashboard
You can access the Traefik Proxy dashboard via kubectl port-forward:
# Run this in a new terminal or put it in the background :
kubectl port-forward -n traefik-system deploy/traefik 9000:9000
Open http://localhost:9000/dashboard/ in your web browser. This is especially useful to help you debug routing and certificate issues.
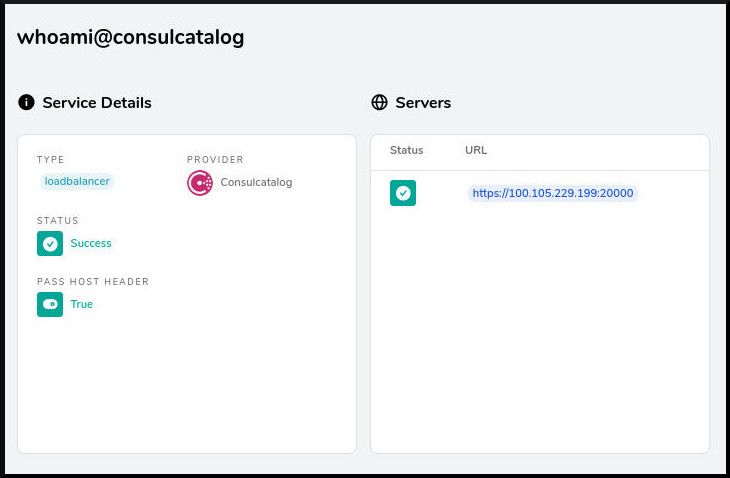
The dashboard shows that the whoami service has been loaded from the Consul Catalog:
Create Consul Intentions to create an Access Control Policy
Service Intentions are the access control mechanism for service mesh routes, and are enforced by the envoy sidecar proxy attached to each Pod in the service mesh. By default, there are no Intentions defined, and so all of the services may communicate freely with one another.
Open the Consul dashboard, and go to the Intentions page. Click on the Create button, in order to create a new Intention:
- For the
Source Servicechoose* (All Services). - For the
Destination Servicechoose* (All Services). - For the description, write
Default Deny All Rule. - For
Should this source connect to the destination?chooseDeny. - Click
Saveto create the Intention.
Now test the whoami service again, using your real service domain name:
watch curl -k https://whoami.example.com
You should see a response of Bad Gateway (if you instead see the normal whoami response, wait up to a few minutes for the Intentions to update to the whoami envoy sidecar, and you should eventually see the Bad Gateway response.)
A response of Bad Gateway means that Traefik can no longer create connections to the whoami service inside the service mesh. This is expected, given the new deny-all Intention just created.
Create another new Intention that specifically allows access from traefik-system-ingress to whoami:
- Click the
Createbutton to create a new Intention. - For the
Source Servicechoosetraefik-system-ingress. - For the
Destination Servicechoosewhoami. - For the description, write
Allow traefik ingress to whoami. - Under
Should this source connect to the destination?chooseAllow. - Click
Saveto create the Intention.
The new Intention should immediately update the curl response back to the normal whoami response:
Hostname: whoami-7c5c99df9f-wg8dj
IP: 127.0.0.1
IP: ::1
IP: 10.42.0.106
IP: fe80::4802:45ff:feb5:f605
RemoteAddr: 127.0.0.1:40408
GET / HTTP/1.1
Host: whoami.k3s-gtown.rymcg.tech
User-Agent: curl/7.77.0
Accept: */*
Accept-Encoding: gzip
X-Forwarded-For: 10.42.0.0
X-Forwarded-Host: whoami.k3s-gtown.rymcg.tech
X-Forwarded-Port: 443
X-Forwarded-Proto: https
X-Forwarded-Server: traefik-7d5987b69b-67chg
X-Real-Ip: 10.42.0.0
You have now created secure default Intentions, denying all routes by default, except for the one explicit route from Traefik to whoami. This completes your development testing!
Use the ServiceIntentions CRD
In the previous section you created Intentions interactively, through the Consul dashboard. You can also declare ServiceIntentions in Kubernetes, which is a CustomResourceDefinition (CRD) installed with Consul.
To setup the CRD, you must create ServiceDefaults resources to default to using HTTP only. Create service-defaults.yaml:
apiVersion: consul.hashicorp.com/v1alpha1
kind: ServiceDefaults
metadata:
  name: whoami
  namespace: consul-demo
spec:
  protocol: 'http'
Apply the service-defaults.yaml:
kubectl apply -f service-defaults.yaml
Here is an equivalent ServiceIntentions resource to create a global Deny All rule, and an explicit rule for whoami. Additionally, this example adds some extra path criteria to demonstate a fine-grained access control policy. Create service-intentions.yaml:
apiVersion: consul.hashicorp.com/v1alpha1
kind: ServiceIntentions
metadata:
  name: whoami
  namespace: consul-demo
spec:
  destination:
    # Name of the destination service affected by this ServiceIntentions entry.
    name: whoami
  sources:
    # The set of traffic sources affected by this ServiceIntentions entry.
    # When the source is the Traefik Proxy:
    - name: traefik-system-ingress
      # The set of permissions to apply for Traefik Proxy to access whoami:
      # The first permission to match in the list is terminal, and stops further evaluation.
      permissions:
        # Allow accessing the root URL via GET only:
        - action: allow
          http:
            pathExact: '/'
            methods:
              - GET
        # Define a deny intention for all other traffic
        - action: deny
          http:
            pathPrefix: '/'
Once applied, you can access https://whoami but https://whoami/data will be denied.
You can see the result in the Consul dashboard:
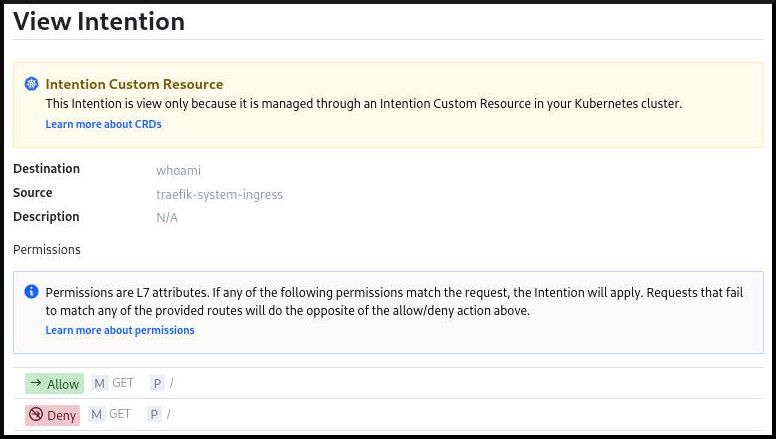
Note that when you use the ServiceIntentions resource, the intentions still show up on the dashboard, but they are read-only, entirely managed by the CRD.
Moving to production
Now that you have tested Traefik Proxy and Consul, in a development environment, you are ready to move it to a production/staging cluster.
Your production cluster may have strict access controls, or have deployments made from a CI/CD system, depending on your environment. For this demonstration it is assumed you still have direct kubectl access, just like in development.
Temporarily switch your kubectl over to the production cluster configuration:
# Load PRODUCTION config:
export KUBECONFIG=$HOME/.kube/name-of-your-prod-cluster-config
Check the status of the nodes in your production cluster:
$ kubectl get nodes
NAME                                          STATUS   ROLES                  AGE     VERSION
ip-172-20-32-58.us-east-2.compute.internal    Ready    node                   2m54s   v1.20.6
ip-172-20-42-230.us-east-2.compute.internal   Ready    control-plane,master   3m35s   v1.20.6
ip-172-20-55-97.us-east-2.compute.internal    Ready    node                   2m50s   v1.20.6
ip-172-20-61-79.us-east-2.compute.internal    Ready    node                   2m40s   v1.20.6
Install Consul in production
Consult HashiCorp's guide for production deployment.
Install Consul, via the Helm chart, passing your consul-values.yaml file, run:
kubectl create namespace consul-system
helm upgrade --install -f consul-values.yaml \
  consul hashicorp/consul --namespace consul-system
Check that the Consul pods are started:
kubectl get pods -n consul-system
Create a new gossip encryption key:
kubectl create -n consul-system secret generic consul-gossip-encryption-key --from-literal=key=$(kubectl -n consul-system exec -it consul-server-0 -- consul keygen)
Edit the consul-values.yaml, find the commented out section used for production, and uncomment it:
  ## For production turn on ACLs and gossipEncryption:
  acls:
    manageSystemACLs: true
  gossipEncryption:
    secretName: "consul-gossip-encryption-key"
    secretKey: "key"
Redeploy with the new values:
helm upgrade --install -f consul-values.yaml \
  consul hashicorp/consul --namespace consul-system
Check the Consul dashboard:
# Run this in a new terminal or put it in the background :
kubectl port-forward --namespace consul-system service/consul-ui 18500:80
(Open your web browser to http://localhost:18500)
With ACLs turned on you'll notice that you're not allowed to create Intentions anymore from the dashboard, unless you log in in with a token. Intentions created by ServiceIntentions CRD will still work.
Install whoami in production
For the whoami service, you must change the consul.hashicorp.com/service-tags annotation. Make a copy of whoami.yaml into whoami.production.yaml and change the following values:
traefik.http.routers.whoami.rule- the Host rule should change to be the production domain name for whoami.
Apply your modified whoami.production.yaml in the consul-demo namespace:
kubectl create namespace consul-demo
kubectl apply -f whoami.production.yaml
(The whoami service should now be seen on the Consul dashboard.)
Install Traefik Proxy in production
Please note that this method installs Traefik Proxy with only a single replica. This will allow you to use automatic Let's Encrypt certificate generation, and acme.json stored in a single volume. This is ideal for testing on a single node. However, for most production roles, you will need higher availability than this configuration provides, and you need to run more replicas in a multi-node cluster. Having additional replias each store their own version of acme.json will not work, they will conflict with each other. Therefore, if you need to use the same TLS certificates on more than one replica (or even multi-cluster) you will need to use Traefik Enterprise for distributed certificate management instead.
Create the traefik-system namespace:
kubectl create namespace traefik-system
Copy traefik-secret.yaml to traefik-secret.production.yaml, and make any necessary changes to your ACME DNS configuration for your production environment, then deploy it:
kubectl apply -f traefik-secret.production.yaml
You should now delete traefik-secret-production.yaml so that it only exists in the cluster.
Install the Traefik helm chart:
helm upgrade --install -f traefik-values.yaml --namespace traefik-system \
     traefik traefik/traefik
Find the Traefik service LoadBalancer external IP address:
kubectl get svc -n traefik-system traefik
The EXTERNAL-IP is shown, which may be a domain name rather than an IP address. To resolve a domain name as an IP address, you can use the nslookup tool:
nslookup your-loadbalancer.example.com
In your DNS system, create a wildcard DNS A record for your production domain (*.example.com), pointing to your Traefik service LoadBalancer's IP address.
Test that the production whoami service responds via curl (replace your production whoami domain name):
curl https://whoami.example.com
Examine the certificate issuer:
curl -vII https://whoami.example.com
Ensure that the certificate issuer says: C=US; O=Let's Encrypt; CN=R3
Now you have successfully deployed your public production whoami service (running from a production Consul service mesh!).
To see it in action, register for our upcoming online meetup on September 1st, "What's New in Traefik Proxy 2.5". We'll go through the 2.5 release and demonstrate all the new features, including the Consul Connect integration.
Acknowledgments
Thank you to apollo13, Gufran, and others for working on the Consul Connect features in Traefik v2.5, as well as apollo13 for his review of an early draft of this post before publication.


